The Way Of Life: June 2023
Google

Friday, June 30, 2023

How to Make Custom Sort on Google Data Studio


In many cases, by default, Google Data Studio uses alphabetical order to sort the data. For example, sorting names like below :

  1. Aaron
  2. Harper
  3. Jack
  4. James
  5. Noah
  6. Oliver


But how if we want to make custom sort without using alphabetical order because in many cases we can’t use alphabetical sort. For example for sorting grades from Pre-K to K12 grades.


 And here are the steps on how we make a custom sort on Google Data Studio.

    1. On the Data pane add a new field


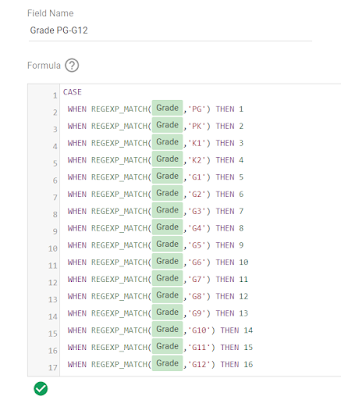
    2. Let’s say we make our field “Grade PG-K12”, and add the code below on the formula box.

        CASE

             WHEN REGEXP_MATCH(Grade,'PG') THEN 1

             WHEN REGEXP_MATCH(Grade,'PK') THEN 2

             WHEN REGEXP_MATCH(Grade,'K1') THEN 3

             WHEN REGEXP_MATCH(Grade,'K2') THEN 4

             WHEN REGEXP_MATCH(Grade,'G1') THEN 5

             WHEN REGEXP_MATCH(Grade,'G2') THEN 6

             WHEN REGEXP_MATCH(Grade,'G3') THEN 7

             WHEN REGEXP_MATCH(Grade,'G4') THEN 8

             WHEN REGEXP_MATCH(Grade,'G5') THEN 9

             WHEN REGEXP_MATCH(Grade,'G6') THEN 10

             WHEN REGEXP_MATCH(Grade,'G7') THEN 11

             WHEN REGEXP_MATCH(Grade,'G8') THEN 12

             WHEN REGEXP_MATCH(Grade,'G9') THEN 13

             WHEN REGEXP_MATCH(Grade,'G10') THEN 14

             WHEN REGEXP_MATCH(Grade,'G11') THEN 15

             WHEN REGEXP_MATCH(Grade,'G12') THEN 16

        END

As you can see, we are using CASE, and it works the same way as IF-THEN function.  It means WHEN the field “Grade” value is  "PG” then it returns 1 and so on ( 2, 3, 4, 5,..).

Then Save and click Finished.


    3.  On the Chart pane, change the Sort Option using our new Field, and set it to Ascending, and by             default google normally pickup “SUM”. But remember this option can vary related to each case.

    4.  And now we can sort our data using our custom sort.


Good Luck.


Software :

Google Data Studio

Labels: , ,

How to Remove Password from Protected Sheet on Ms. Excel


There are several ways to remove password from the protected sheet, but I am choosing one that is simplest and easier. That is Using Google Sheets.

  1. Open Google sheet on your browser
  2. Click File – Import, and upload your protected Excel files. Choose an option: Replace Spreadsheet.

  3. Then Click File – Download as Microsoft ( .xlsx ) files.

  4. Open downloaded Excel files and you have unprotected Excel files from your original protected Excel files. It’s Worked!

For your information, I already tried using VBA Editor.

  1. Open the Excel file.
  2. Press "Alt + F11" to open the VBA editor.
  3. In the VBA editor, click on "Insert" and then choose "Module" to insert a new module. In the module window, paste the following code:

            Sub UnprotectSheet()

                Dim ws As Worksheet

                    For Each ws In ActiveWorkbook.Worksheets

                        ws.Unprotect

                    Next ws

            End Sub

Then Press "F5" to run the code. This will unprotect all sheets in the workbook and Save the file


But it still asks you for the password like the image above. So today with this method, we can’t use it anymore.

And the third way is by save as your protected Excel files to .zip files and then edit the .xml files. Yes maybe it works but it’s too complicated for some users.


Good Luck.

Hope this is useful.


Software :

Microsoft® Excel® for Microsoft 365 MSO (Version 2305 Build 16.0.16501.20074) 64-bit

Windows 10 Pro 64 bit.


Labels: , , , ,